

Lamps worked well, would probably take 3 or 4 to light a typical room adequately 🙂
Yay! Found it again. Came across this article awhile ago, thought it was pretty cool (I mean hot. lol.) But I hadn't saved it, so forgot where I'd seen it. I'm going to try making one.
How to make a candle heater
http://www.tacticalintelligence.net/blog/how-to-make-a-candle-heater.htm
Cool article, my hubs liked it too so we bought the pots and hardware to make one yesterday and plan to put it together this weekend. Our only issue at this point is the stand, not sure how we'll make one, but I don't like the one the guy who wrote the article made. We'll have a boo at the hardware store and see what we can find 🙂

I was reading recently (can't recall where) that any kind of oil can be used in those lamps- including waste cooking oil. It might not smell the best but then again, if we are talking survival, that would not be our main concern. I figure if you strained your oil through a mesh strainer to get out the flammable "chunks" this would work just fine.

My granny always had a big coffee can of "drippins" on the back of the stove where she drained all of her skillets. Probably a good thing to put into practice now, while oil is plentiful. I plan to store these in my shed out back or in the cellar - not sure where yet.
Oh - awesome article, Billy Rubin. I'm definitely going to use some of those ideas.

Paintergirl, I think your on the right track there with the heavy plastic for sure.

Good point about the plastic! I heat my house with wood and have more than enough to last the winter. But if an earthquake blew out the windows - of course! - We'd be chilly. I'm adding a roll of heavy clear plastic and more duct tape to the list!

I too live in a condo, mid island. We bought a mister heater. They work like a hot d@mn and come in sizes big enough to heat a barn or a van. When the SHTF we will not be able to buy propane so have 2 bottles stored on our deck. With frugal use this should last quite a while. The safety features are good also. Should it be knocked it shuts off or if the air becomes thin [using in van] again it shuts off. We have done test runs with it and find it to be an excellent alteritive.

Okay, this is just me living that fantasy where I won a really small lottery, and bought a used trailer.
http://www.marinestove.com/sardineinfo.htm
I like the fact they are cast iron, made in Canada, although very pricey. Look around, there are some on the mainland and some up-island that must be cheaper. Check out kijiji.ca
Check out these guys, although made in the USA they also look like good quality. http://www.nuwaystove.com/contact.php they burn wood and/or propane
Princess auto carries camp stoves, TSC store carries camp stoves. All ranging in price from $69 to $400
Why not look into making your own rocket mass heater? The rocket mass heater can also be used to heat up the kettle if designed that way, cheap, easy and reliable. It is aprox. 80% more efficient than a regular wood stove as well.
I will be making one up at the camp when I can haul the parts in on the trailer, hauling everything in on the sled behind me is for younger people, I am starting to feel my age I guess.
Check this out, what an awesome stove deal small footprint and larger at the same time.
http://bc.kijiji.ca/c-buy-and-sell-art-collectibles-antique-wood-coal-stove-W0QQAdIdZ305953394
another idea is to hook up with demolition sites, crews they have lots to offer sometimes, if your prepared to wait a bit.
http://bc.kijiji.ca/c-buy-and-sell-home-appliances-refrigerators-DEMOLITION-SALE-SURREY-W0QQAdIdZ350320422

I have one of the "wilderness" stoves and in a pinch I used pine cones for fuel, surprisingly it provided a lot of heat. If you put a couple of inches of sand or dirt in it you don't have to worry about floor clearance as much.
http://www.walltentshop.com/CatStoves.html
Excellent posts everyone.
Until you do what you believe in, you don't know if you believe in it or not.
Leo Tolstoy

If you put a couple of inches of sand or dirt in it you don't have to worry about floor clearance as much.
For every stove I have I put bricks on the floor under the legs first, then a sheet of aluminum (or galvanized steel- anything shiny) between the legs and the bricks creating an air gap between the aluminum and the floor. Probably better than reducing the volume of the firebox. If you're looking to extend the life of the stove a layer of fire brick is a good idea.
So much heat is wasted already up the chimney you want to save as much as you can. The belly of the stove will radiate heat as well, the reflective sheet gets it back to you and doesn't heat up the floor.
If you want to get fancy you can bend the sheet like in inverted "vee" to reflect the heat sideways instead of just up. I've also made reflectors for the chimney pipe(on long runs) to get some of that heat back too.
Always have a large pot or bucket of water on the stove to capture more heat and humidify the air. Humid air "feels" warmer than dry air.
I just found this link to tons of other links for self made stoves!
They are even listed in Catagories (sort of like I would do, hmmm, anal or just organized)
http://zenstoves.net/LinksGeneral-DIY.htm
It isn't that hard to make a stove but try to get your place insured if they find out. Or if your place does experience a fire you could be denied coverage even if it had nothing to do with it - and you'll have to prove it had noting to do with it.
Hell, it's hard enough to get your place insured with an approved, registered, serial numbered and whatever else stove for a decent rate.
Having said that I have built a couple.
This one was neat. It was over 4 ft long to burn hardwood from pallets for shipping steel coils.
Started with a water heater tank.
Cut the welds off one pressure head and reversed it so it's now an out-out vessel(your water tank is a one-in, one-out).
Cut out a door.
Bend some pipe to fit the door curve.
Carefully split the pipe, weld around the perimeter of the door, now you have a channel to retain the gasket.
Weld the head back on, add some legs, the exhaust fitting.
I used a bottom air intake (the crank beneath the door) into a baffle underneath the fire.
Then I welded a bunch of fins around the outside to be covered by a thin sheet of tin(half removed for clarity). A fan blows air across all the hot fins and out the front(you can just see the square window fan at the rear).
This thing worked fantastic. It would get my old shop (25x35ft)from below freezing to shirtsleeve temps in under an hour or so without using too much wood.
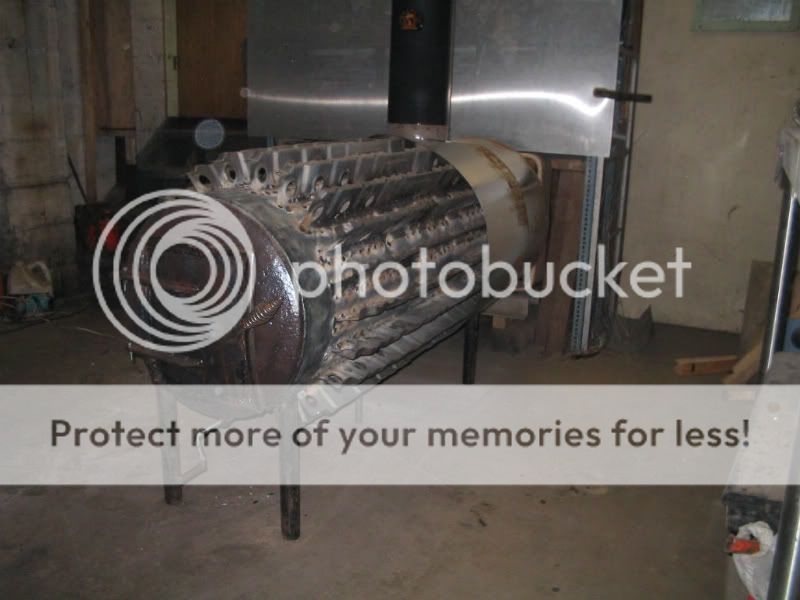
Sadly I had to vacate the shop, the stove is now sitting under the cabin at the BOL, waiting for a home.
I agree with WildernessReturn, a rocket mass heater is a better route(the best) but it's a permanent installation.

Daisy,
If you can ride out in one room alone I recommend a couple of hurricane oil lamps (2 for under $20 at wal mart or home sense) and some 3 or 5 wick candles.
When my power was turned off a couple of years ago, the kids and I hung heavy plastic & blankets over the windows & doorway, laid out our sleeping bags & comforters on the floor of our dining room (the smallest room) and only had 2 lamps and 1 candle. It wasn't super toasty but it was the middle of February and we didn't freeze to death. Bundled up accordingly, the kids called it our winter camping trip. lol But, the point is we didn't freeze. Even 3 or 4 large jar candles would work instead of the 5 wick. I get large jars from Giant Tiger for under 5 bucks and they last about 30 hours burning continuously. It's not a 3 or 4 month fix but works in a crunch.
I just found this link to tons of other links for self made stoves!
They are even listed in Catagories (sort of like I would do, hmmm, anal or just organized)
http://zenstoves.net/LinksGeneral-DIY.htm
Awesome! Thank you! This link is amazing.
Perfesser, that stove is really cool!