As part of your preparedness arsenal, shelf-stable foods hold a pivotal place. For those in the prepper community—especially in rural or off-grid settings like Central Ontario—being able to safely home-can meat is a strategic way to extend your food supply, reduce dependency on fresh deliveries, and increase resilience against supply chain issues or power interruptions. Below is a deep-dive article tailored to your detail-oriented mindset: the how, the why, the safety rules, and practical tips for staging your home-canned meat pantry.
Why can meat at home?
- Long-term shelf stability – Properly canned meat can sit on the shelf for a year or more, freeing up freezer space and allowing you to build a rotation of “ready-to-go” protein.
- Control over the input – You choose the animal, the cut, the trimming, and the seasoning. For a prepper, that means you can favour lean cuts, home-slaughtered game or livestock, and avoid additives.
- Emergency readiness – In a scenario where refrigeration or power fails, meat in sealed, well-processed jars remains safe and usable (provided it was canned properly).
- Efficiency of bulk processing – When you harvest livestock, wild game, or buy a half-or-whole animal, turning portions into shelf-stable jars is a smart use of labour and resources.
Safety is non-negotiable
Since meat is a low-acid food, the risk of the bacteria Clostridium botulinum (which causes botulism) thriving is real unless the process is done correctly. Home Food Preservation+2Home Food Preservation+2
Here are the essential safety points:
- Use a pressure canner (not a boiling-water bath) for meat, poultry, game — because only a pressure canner reaches the temperatures needed to reliably destroy the spores of C. botulinum. Home Food Preservation+1
- Always start with good quality, chilled meat. The meat must be handled hygienically, trimmed of fat/gristle, chilled quickly after slaughter (to ≤40 °F / ~4 °C) or frozen until you’re ready. Nation Institute of Food and Agriculture+1
- Follow tested processing times and pressures exactly. Variables include jar size (pint vs. quart), pack style (hot vs. raw), elevation, and type of canner (dial or weighted gauge). Home Food Preservation+2Home Food Preservation+2
- After processing, make sure the seal is secure, jars are cleaned, labelled with date, and stored in a cool, dry, dark place. If there’s any doubt about safety (e.g., bulging lid, spurting liquid, off smell), throw it out. MSU Extension Apps
Steps to home-can meat (overview)
1. Prepare your workspace & materials
- Clean and sanitize jars, lids, and equipment.
- Make sure your pressure canner is in good condition, the dial gauge (if present) has been checked in the past year, and the manufacturer’s instructions are at hand. Nation Institute of Food and Agriculture
- Label jars ahead of time with type of meat, date, process method (hot or raw), and other notes (cut, seasoning, etc.).
- Trim meat: remove excess fat (too much fat can cause seal failures or spoilage), remove gristle, bruised spots. For wild game with strong flavour, you may “bleach” via brine (1 Tb salt per quart of water) for 1 hour then rinse. Home Food Preservation+1
2. Choose your meat and pack style
You can consider different “styles of pack”:
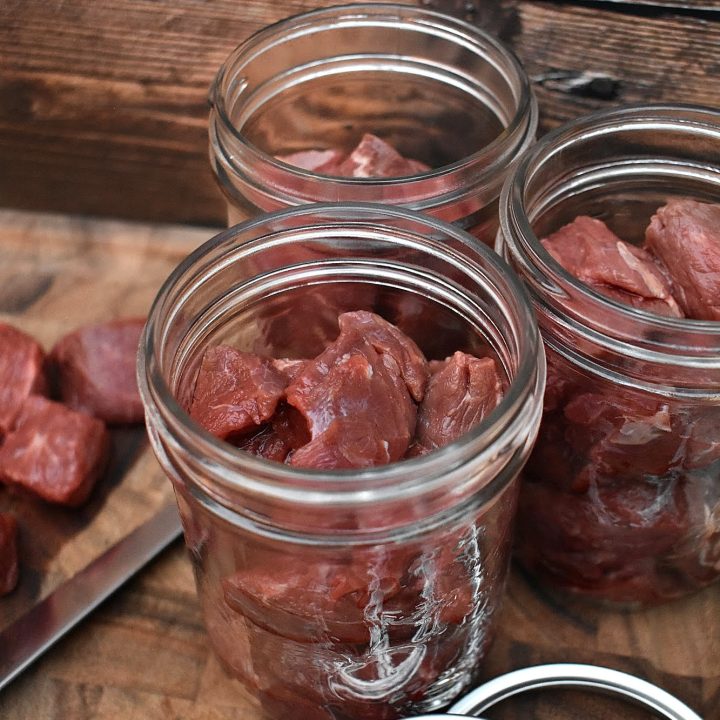
- Raw pack: Cold or raw meat pieces placed into jars, sometimes without added liquid; you leave appropriate headspace. For example: strips, cubes, or chunks of meat – raw pack allowed. Home Food Preservation+1
- Hot pack: Pre-cook the meat (e.g., browning, roasting or stewing until rare) then pack pieces into jars. Add boiling broth or water as liquid to cover (for some styles). Hot pack helps ensure better liquid fill and quality in storage. Home Food Preservation+1
3. Fill jars
- Leave correct headspace: e.g., for cubes/chunks of meat you’ll often leave ~1 inch headspace. Home Food Preservation+1
- Optionally add salt for flavour: but note, salt does not substitute for safety — processing time/pressure is what ensures safety. North Dakota State University
- Wipe jar rims clean, place lid and screw band fingertip-tight.
- If you used hot pack with broth/liquid, remove air bubbles (use a non-metal spatula). Nation Institute of Food and Agriculture
4. Process in the pressure canner
- Add 2-3 inches of hot water to canner’s base (unless manufacturer says otherwise). Place rack, jars. Fasten lid. Vent the canner (i.e., allow steam to escape) for 10 minutes (with weight off or petcock open). Nation Institute of Food and Agriculture
- After venting, apply weight or close petcock, bring to required pressure. Maintain steady pressure for the full time indicated in the recipe for your elevation. Do not rush by opening early or forcing cooling. MSU Extension Apps+1
For example: For ground or chopped meat in quart jars (hot pack) at sea level with a dial gauge, process 90 minutes at 11 lbs of pressure. Home Food Preservation
5. After processing
- Let canner depressurize naturally. Do not force-cool with cold water or open before pressure returns to zero — doing so can cause jars to lose liquid and fail to seal. MSU Extension Apps
- Remove jars, place them on a rack or towel, upright, with air circulation underneath. Let cool undisturbed (~12 hours).
- After cooling, remove screw bands, wipe jars, label storage date, store in a cool, dark, dry place. Best quality tends to be within a year. MSU Extension Apps+1
6. Using your home-canned meat
- When you open a jar, check lid vacuum, any spurting, odd odour or colour. If anything looks off — discard without tasting. As noted: botulism toxin cannot be seen, smelled or tasted safely. Home Food Preservation+1
- Though safe if processed properly, some guides still recommend boiling the meat for 10 minutes before using, especially if you are unsure of the canning history. Ohioline
- Use your canned meat in stews, chili, casseroles, pies — the advantage is you already have cooked / pre-cooked meat ready to go when you open the jar.
Specific considerations for preppers / off-grid readiness
- Altitude/Elevation: Since you’re in Central Ontario (depending on exact location, elevation may be modest) but if you ever relocate or use this system elsewhere, remember: higher elevation = lower boiling point = you must increase pressure or processing time. Always consult local extension info. MSU Extension Apps
- Game meat or self-slaughtered livestock: Many preppers harvest game (venison, moose, wild hog) or raise livestock. Note: wild game often needs special handling (brining, trimming, etc) as noted above. Also: only meat from healthy animals should be used. Ohioline
- Fat content: Leaner cuts are better for canning because excess fat can interfere with sealing and storage quality. Trim fat well.
- Electricity / power outages: Even if your freezer fails, canned meat remains safe. Maintain a stock of jars with variety of meats (beef, pork, wild game) for redundancy.
- Rotation and labeling: Date your jars clearly. Use “first in, first out” so your oldest jars are used first. Maintain an inventory log (your prepper-habit) so you know what variety, what date, what quantity you have.
- Emergency meal planning: When you’re building your retreat book or your blog posts (you mentioned you build many guides and tables) incorporate canned-meat meals: e.g., “One quart jar beef cubes + dehydrated veggies + rice = 4-6 servings stew in under 30 min when water is hot.”
- Cross-post content: For your audience, you can create a downloadable table: “Meat type / Cut / Jar size / Process time & pressure / Recommended recipe usage.” Your blog would benefit from a PDF asset with diagrams of jar packing, headspace, pressure canner checklist.
Common mistakes & myths to avoid
- Myth: You can just use a regular pressure cooker – Wrong. A pressure cooker (for cooking) is not equivalent to a pressure canner rated for home canning. Only properly designed pressure canners should be used. North Dakota State University
- Mistake: Using old family recipes blindly – Many traditional canning recipes pre-date current safety research. The modern guidelines (USDA Complete Guide to Home Canning, 2015 revision) are based on research. Use only tested, up-to-date recipes. Healthy Canning+1
- Mistake: Not adjusting for elevation – As mentioned, if you’re at higher elevation, the process pressure/time must be adjusted or you risk underprocessing.
- Myth: If the jar seals, it’s safe – Sealing is a good sign, but doesn’t guarantee safety if processing time/pressure was inadequate. Always ensure you followed correct parameters.
- Mistake: Canning cured meats or ham without verified process – Not all meats (especially heavily cured, smoked, or injected) have research-based canning instructions. If you’re canning such products, proceed with caution or avoid. Ask Extension
Suggested workflow for your next canning session
Given your prepper-oriented approach, here’s a workflow you could embed in your content and repeat:
- Day -2: Harvest (or obtain) meat. Immediately chill or freeze if you can’t can within 2 days.
- Day -1 (prep day):
- Clean and inspect all canning gear (jars, lids, bands, canner).
- Sort meat: trim fat, remove gristle/bruise, thaw if frozen.
- Decide pack style: “ground/chopped” vs “cubes/chunks” vs “strips”. If game meat, consider brine soak.
- Pre-cook if doing hot pack method. Make or prepare broth if using liquid fill.
- Label jars ahead: “Beef cubes – 2025-10-27 – Hot pack”.
- Day 0 (canning day):
- Pack jars, leave readable headspace. Clean rims, apply lids & bands.
- Set up pressure canner: add water, pre-heat if needed.
- Load jars. Vent canner 10 min. Achieve required pressure at adjustment for your elevation.
- Process for required time (e.g., 90 min for quarts at base elevation for cubes/chunks). See tables. Home Food Preservation
- Depressurize naturally. Remove jars and cool 12 hours undisturbed.
- Post-processing:
- Remove screw bands, wipe jars, label with use-by (“best quality by 2026-10”).
- Store in cool, dry, dark place. Keep inventory log (type, date, quantity).
- Usage plan:
- Rotate jars into your meal planning: e.g., 1 jar = protein base for soups/stews.
- At first use: inspect the jar (seal, clarity, odour). Bring content to boil before consuming if you want added margin of safety.
- After opening, refrigerate leftovers promptly.
Closing thoughts
For a prepper mindset, home-canning meat is more than just “putting jars on the shelf” — it’s about control, resilience and planning. By following the research-based guidelines from authorities like National Center for Home Food Preservation or extension publications (e.g., from Ohio State University Extension) you minimise risks and maximise shelf-stable protein resources.